Sunday, April 14, 2013

Luxe magazine Colorado Winter 2012

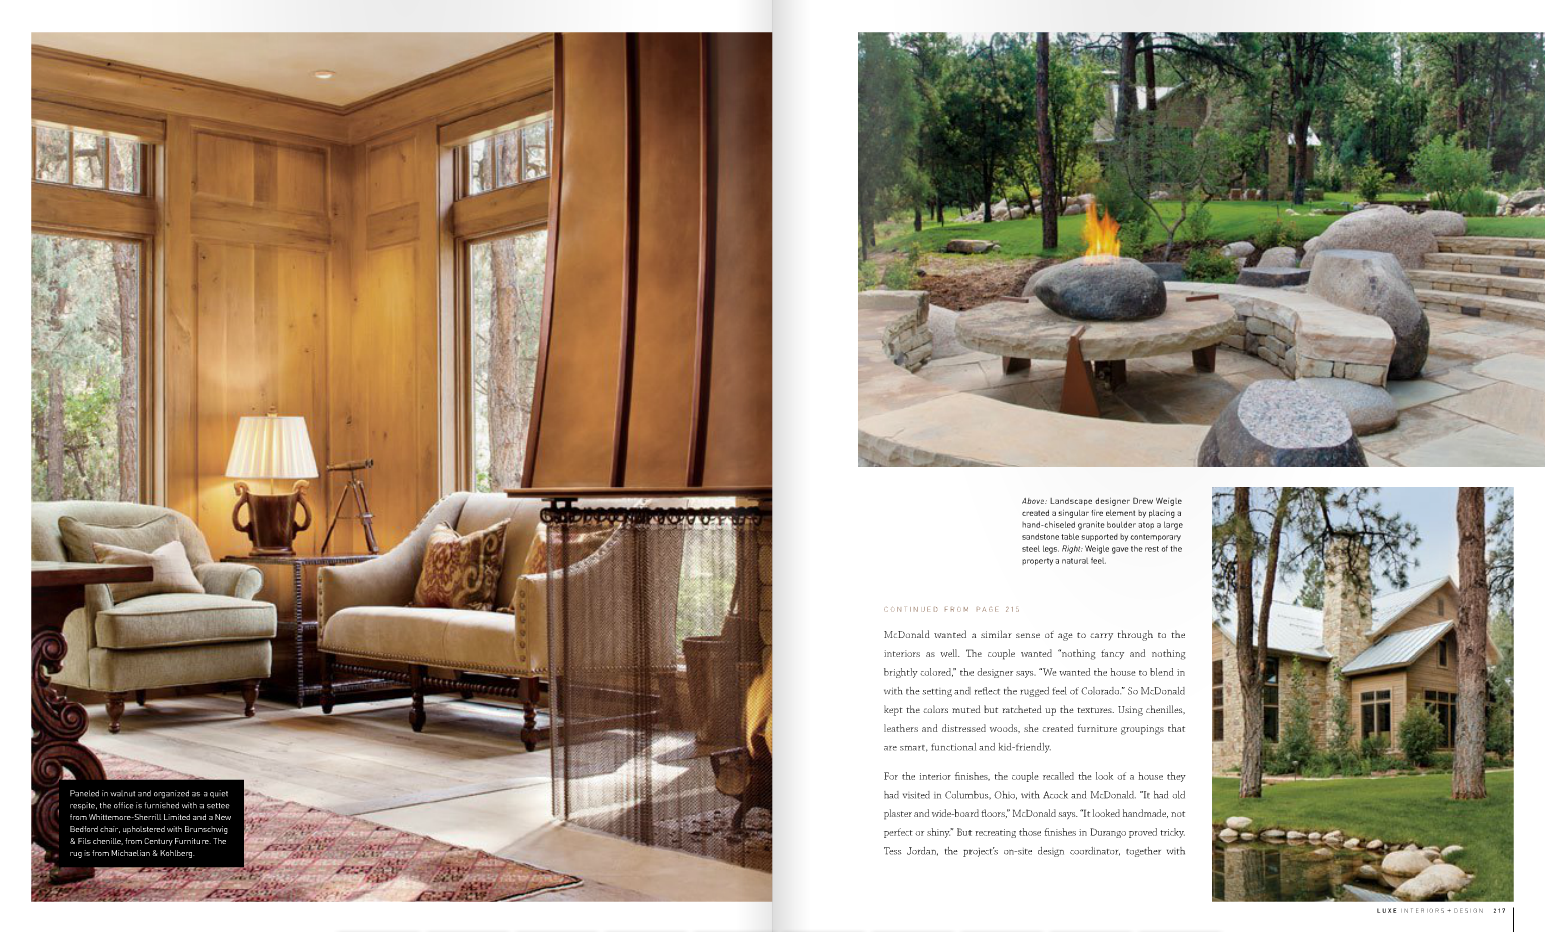
This is the feature spread of a project we photographed in Durango last year. It was really beautiful home located on the banks of the Animas river. Here's a list of a few of the people involved in the construction and design of the home and landscaping.

Contractor: Madera Construction
Architect: Acock and Associates
Landscape design: Eco-Logical Resources
Interior design: Interiorworks and Jordan Design


Luxe Colorado Winter 2013

Thursday, March 21, 2013

Multi-day time lapse of a solar installation - The final product!

Finally! Here is the final product of the time lapse.


You can also watch it on Vimeo. Click this link: https://vimeo.com/62178905


In my previous posts I described the set up and planning for one main camera. In the video, there are two other views from other cameras that were shooting at the same time. One camera was clamped to a pipe and captured the installation of the inverter boxes on the side of the building. It was shooting a time lapse at 1 second intervals. The footage was then sped up in FCP. The third camera was a Canon G12 set on a tripod. It wasn't shooting stills but rather video. I then sped up the footage by 20x, giving it a timelapse effect.

I would like to thank Trina Solar for bringing me on board to do this project. Also, I want to thank all of the staff of the American Lung Association in California for all of their warm generosity. They really rocked! Last but not least, a ton of gratitude goes out to the crew at Everyday Energy. Everyone from their management to the guys working on the roof were super helpful and communicative about what was going on with schedule and logistics. They helped me out throughout the project and were extremely nice the whole time!


Wednesday, March 20, 2013

Multi-day time lapse of a solar installation - The support rig


Today, I am going to describe the stand and enclosure that used for my time lapse set up. One of the big challenges I faced, was that I needed to mount a camera up high above the roof. The solar array is fairly flat and a high perspective gives the best unobstructed view for the camera. Unfortunately, there was nothing to mount the camera to that got it high enough. After exploring different options like tripods, ladders and light stands, a C-stand proved to be the best solution.
  • It could be extended to a height that I needed, 10-15'
  • It is heavy duty enough to hold the camera and enclosure
  • It could be easily sand bagged 


Next, the camera needed a protective enclosure. The camera was going to stay on the roof for an extended period of time and need protection from rain, bird poop, and other elements. Also, an enclosure on top of a stand wouldn't look as enticing to a thief as a bare camera and lens. 


I used a hard plastic case similar to a Pelican case. It was actually kind of tricky to find a case that was the right dimensions to fit the camera into.  I found the Seahorse SE-540 Case at Fuerte Cases. This case was just deep enough to house the 1Ds and 24mm lens with a couple filters stacked on it. It also had enough room to store the AC power inverter and intervalometer next to the camera.

The first step to building the enclosure was to create a window for the camera to shoot through. I cut a square hole that was approx. 6"x6" in the case opposite the lid opening. Then, a piece of 1/4" glass was epoxied into the inside of the opening.


Next, I drilled holes in the bottom of the case to run a 1/4" 20 screw through for mounting the camera and to run the power cord out the bottom of the case. I drilled a few extra holes in the bottom for ventilation so if the case got hot, it could release the hot air and not become an oven for the camera.

The enclosure was mounted to the C stand with a small ball head.The quick release of the ball head was threaded with 1 1/2" screw that ran through the bottom of the case. The camera mounted onto the 1 1/2" screw.

The stand was raised to its maximum height which was about 13'. Three sand bags weighted down the stand base. While the C stand is fairly heavy duty, the camera still swayed in the wind when everything was fully extended. This required me to tie on some guy lines to the top of the stand right below the camera. By using three lines, spaced equidistantly and tied off with weight bags, the camera could be stabilized in windy conditions. It wasn't perfect, but it did make for a much more solid configuration.


In the next post, I'll talk about what worked as planned and what failed and needed improving.

Wednesday, March 6, 2013

Multi-day time lapse of a solar installation - The camera

This a continuation of my last blog post illustrating my set up and process for a multi-day time lapse of a solar installation. In my first post, I went over the math to calculate how many shots were needed and what the interval duration of those shots needed to be. Today, I'll describe the camera set up that was used and why used what I used.

The Camera
My first thought when choosing a camera was a GoPro camera. It is small, lightweight, waterproof and wide angle. After researching it, I discovered that the Go Pro cameras only allow for a maximum interval duration of 1 second. This project needed between 30 seconds - 2 minutes depending on the full duration of the project. Unfortunately, the Go Pro was out.

Another consideration was power supply for the camera. If it needed to be on for multiple days battery life could be an issue. I didn't want the battery to die and not know it, thus stop capturing images. My Canon 1Ds MKII has an AC adapter that allows it to be plugged in. I'm sure AC adapters are available for a lot of cameras, but I already had one available for my 1Ds so that was a big decider for camera choice. With the AC adapter, the camera could be plugged in and run perpetually for as long it had capacity to record images.

The array was to be about 150'x50', so a wide angle was needed. Originally, I chose a 24mm but changed it to 20mm at the last minute. I didn't know exactly how big the array would be and where the exact positioning of the panels would be, so I played it safe with a wider lens. The resolution of the camera totally allowed for some cropping if the image is too wide.

I'm using a knock off Chinese made intervalometer to control the time lapse. It cost me $20 on E-bay and still works pretty good. Sorry Canon, this is one where I just couldn't justify the $150 price tag for your product.

The weather is predicted to be bright and sunny. Now it's time to go back in time and remember those cool little exposure guides on the inside of Kodak film boxes. It told you that in order to expose the 100 ISO film properly on a bright and sunny day, the exposure needed to be set at 1/125 sec at f/16. Based on my intervalmeter's limitations, the fastest shutter speed I can use is 1 second. 1 second is 7 stops brighter than 1/125 sec. For a 1 second shutter speed, that would require an aperture of f/180. Most lenses have a minimum aperture of f/22 or f/32 so it is necessary to cut down the amount of light entering the lens.

This requires a neutral density filter. which is a neutral grey filter that simply cuts down the amount of light entering the camera. For this project, I used an ND 8 which cuts the light by approx 3 stops. I also stacked a polarizing filter on top of the ND to further reduce the light by 1 1/2 stops. The polarizing filter also enhanced the saturation of the colors and reduced the glare on the reflective solar panels.

The the final exposure will be f/22 at 1/2 sec. Even this will be a little over exposed but the RAW files can be pulled down in Lightroom to achieve a good exposure.

My next post will describe the housing that protects the camera from the elements while it sits on the roof for a few days.




Tuesday, February 5, 2013

Multi-day time lapse of a solar installation - Basic math

Over the next couple of weeks, I'm going to post a series of essays illustrating the process of capturing a long term time lapse. This project presented some issues that required a little thought in setting up my system. I thought this would be a good opportunity to share some of the challenges that were encountered and solutions to overcome them. There are a few unknowns regarding the project(as always) and I'm going to share my learning process to the solve those issues too.

A while back, I was contacted by a large solar installer and asked to shoot a time lapse of an solar array installation. The installation would be on the San Diego office of the American Lung Association. After a couple of bumps and derailments, the solar installation is finally commencing next week.

As I mentioned earlier, there were several issues that caused me to scratch my head. Here are some of the considerations to be addressed:
  • The installation will take between 3-7 days
  • The final time lapse video needs to be 1 minute
  • Need to power a camera and intervalometer for multiple days of shooting
  • The installation is on a flat roof with no locations that a camera can be mounted to in order to look down on the roof to capture the process
  • Camera needs to be protected from potential weather and elements
  • Camera(s) can't interfere with the workers doing the install
The basic math
There are a couple ways to determine how long a time lapse needs to be shot and how many shots per minute need to be shot. If the priority is creating a certain amount of movement in clouds or the sun, one will choose the amount of shots per minute to get the desired effect. Visit Timescapes to get a better understanding of all the elements you should consider.

If the final time lapse needs be a specific amount of time, then a little math needs to calculated to determine how many shots need to be shot. For my scenario here, I have a target time of 60 seconds for my final time lapse video. My final output video will be 24 frames per second, since the time lapse footage may accompany interview or b-roll footage for other videos. Now multiply 24(fps)x60(seconds of final video) and you get 1440 shots to fill a 60 second time lapse.

Now comes the trickier part. In a perfect world, the solar installer would give me a specific amount of time that the installation will take to complete. In reality, he told me this morning that it will take between 3-7 days depending on complications and other factors. My challenge is distributing those 1440 shots in a 3-7 day timeline.

For sake of simplicity, let's assume that the project will take five days. Each work day will be 7am to 5pm or 10 hours. 10 hours a day multiplied by 5 days equals 50 hours of total capture time. We then divide 1440(number of shots) by 50 hours and we get the total of shots per hour of 28.8 or 29. If I shoot one shot every 2 minutes, it will get me very close to making a 60 second time lapse.

As I mentioned before, the actual project time is fairly unknown right now. How I am going to deal with that issue will be addressed in a another post. Stay tuned!


Thursday, April 5, 2012

The new normal

Today, at 12:53pm, I've used the following applications, both local and web, today to do various jobs:
  • Firefox
  • Apple Mail
  • Blogger
  • Calendar
  • iTunes
  • Photoshop 4
  • Bridge
  • Lightroom 3
  • iPhoto
  • Google Sketch up
  • Microsoft Word
  • BlinkBid
  • Final Cut X
  • Final Cut 7
  • Motion 5
  • Compressor 4
  • Keynote
  • Fetch
  • Twitter
  • Facebook
  • Instagram
  • Lynda
  • Snapseed
  • App Store
  • YouTube
  • Vimeo
...and there is probably more but I've lost count. This seems to be the way things are these days. In 18 months, we will all be using 50% tools to do even more jobs and projects that haven't even been thought of today.

Have fun!

Thursday, February 23, 2012

iPhoneography and tumblr

Check out my Tumblr blog to see my iPhoneography! chrisgilesphoto.tumblr.com


Like millions of people who have iPhones, I discovered the joy and freedom of using my iPhone to record clandestine moments every day. What I may enjoy the most, is the liberation of taking a photo, processing it with a myriad of filters and sharing it to the world in seconds...yes, seconds. Instagr.am is my platform of choice. Its a community of artists that are always eager to find and create more visual stimulation. That may be one of the coolest aspects. We can create art, document a scene, experiment in such a spontaneous fashion that it keeps it fresh. We send it out to the world and receive feedback before we have time to think about if it is good enough or really conveys the perfect message. I think most of the stuff that we create with our big cameras never sees the light of day because we have time to nitpick it and overjudge it before releasing it for the world to see.